Saturday, March 29, 2014

Lord Farquaad Ruling costume, start of Wedding costume

Lord Farquaad is coming together.   The Ruling costume is shown below, almost finished.  Still have to attach the cummerbund (pinned at this point), fix the cape attachment point, and finish up a few little things.


The Wedding costume will follow the same design, with white fleece instead of blue, cream corduroy instead of red, white satin instead of blue, cream crushed panne instead of red sparkle, and different trim.  Here are the fabrics:


I couldn't resist the fur for trimming the cape!  I hope it turns out as well as I have pictured it in my mind.

Here I want to show how the puffed sleeves are done.   The cutting layout for the sleeve is shown below, with the strips of corduroy used for the stripes pinned in place.  The lower edge of the sleeve is shown at the top.  It is pinned to the fleece band that will attach to the puff sleeve.   The stripes for the puffed sleeve will be turned under ¼” and sewn as shown in the next picture.


The Wedding costume has gone much quicker now that I am just copying the Ruling costume and using patterns  I made along the way.  Here is the finished tunic.  It is still on the female mannequin but I have it over the he-man chest padding costumer Paulette Morgan made.


Still to complete are the hat, cape, and attaching the gloves to the gauntlets.   And I still have to do the closures (ties) on the back of both tunics and fitting of the cape to the Ruling tunic.  So close! 

Dress rehearsal is Tuesday.  I am nervous about how the costumes will do when the actor is wearing them onstage.  Will they shift?  Twist?  Fall apart?  Have some malfunction?  Get dirty?  Get sweaty?  Luckily I will have costume master Michael Morgan on hand to advise!


Monday, March 24, 2014

Lord Farquaad fitting

The fitting for Lord Farquaad was Saturday morning.  I was able to pin and mark all crucial measurements using a hodge-podge of partially-completed pieces.  

This morning, I sorted through the pinned pieces and started putting them together.  There were only a few additional pieces to cut – the other upper sleeve and red stripes for the sleeve.  I sewed on the red stripes for the 2nd upper sleeve, attached the yellow arm band to the knit lower sleeve, then attached that to the upper sleeve, tightly packing the gathers at the lower edge of the puff.  Then I sewed the arm seam, using a zig zag on the knit section.   Then I repeated these steps with the other sleeve.  After sewing the shoulder and side seams of the tunic, I set in the sleeves, working in the gathers at the top of the sleeve.   The gauntlets had to be interfaced, and the interfacing had to in turn be covered with more blue fleece so the white wouldn’t show.  So there were unanticipated additional steps, but the resulting stiffness of the gauntlet was worth it.  I had to sew on the gold braid by hand – something I usually avoid at all costs! – but it actually was quick and easy.   I sometimes dread what turns out to be the easiest thing.

I have to confess, as I worked I had delusions.    For example, each piece I worked on seemed the hardest.  “If I can just get this part finished, the rest will be easy.”   Hahaha!   Actually, some parts I dreaded ended up being easy (setting in the sleeve) and something that should have been easy seemed hard (the gauntlet!  Lack of planning on my part.).    Another delusion I had was “any regular clothing I make in the future will be easy compared to this!”  Hahaha again, I am sure!  But at least then I would have a pattern.  For this costume, I only had a pattern for the tunic.

Here is what I have so far:  The tunic, with skirt and sleeves attached, shown.  The gauntlets.  The hat (needing a shaped foam inside).   NOTE:  The tunic is draped over a FEMALE mannequin that is not the same size as our actor.  Just sayin.


Still to go:  The gloves (I hope to find some blue knit that matches, otherwise I will have to use the bulky blue fleece), the collar, the cape (needs additional width, black lining, and gold trim), the belt (maybe use the blue satin I have), the foam for the inside of the hat, and gold trim for the tunic, skirt, and hat.   And I thought I was halfway done – maybe not!


My goal is to complete these tomorrow, Tuesday, so I can begin the Wedding costume on Wednesday.  The show opens on April 3, a week from Thursday!

Thursday, March 20, 2014

Planning Lord Farquaad costumes

The last few days I have been obsessing over the Lord Farquaad costumes I have been assigned.  This is for "Shrek the Musical" being staged by a local theater company, Bank Street Players.  I was able to watch the first full-cast read-through of the script a couple of weeks ago and was blown away by the talent!  This is going to be such a fun show!

In "Shrek the Musical," Lord Farquaad wears 3 costumes - an Exercise costume (sweatshirt, sweatpants, etc.), a Ruling costume (fancy royal outfit) and a Wedding costume (a short appearance at the end of the play).  I have been assigned the Ruling and Wedding costumes.

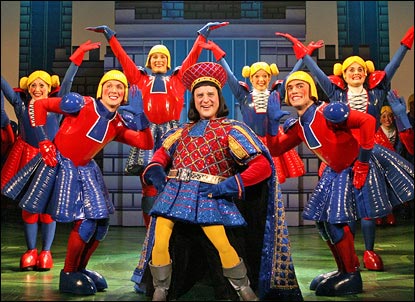
One interesting aspect of these costumes is that the actor will be on his knees for the entire performance!  There will be small fake legs hanging from his belt to the ground to represent Farquaad's disproportionately tiny legs, with the actor's real legs clothed in black and also hidden by a black cape.  Here is an image from
http://www.jimhillmedia.com/mb/images/upload/Shrek-Farquaad-Landscape-we.jpg


Unfortunately, there is no standard, really, for these costumes.  So I browsed references and pictures of Lord Farquaad online, noted the different costume designs that have been used, consulted with the very talented and organized Costume Mistress Paulette Morgan, and surveyed the fabric and trim choices available in town.  Given that Farquaad will be onstage with red, blue, and yellow-clothed dancers as shown above, Paulette and I decided to use red, blue, and yellow for the Ruling costume.  We will go with a pleated skirt and use the puffed upper sleeves and round flared hat seen above.  We will get the best and cheapest (!) fabrics we can and use gold sparkly trim to give it the bling it needs.

The parts of his Ruling costume are:  Cape, tunic, pleated skirt, puffed upper sleeves, fitted lower sleeves, gloves with gauntlets, and hat.  After making a sketch of each one I estimated the amount of fabric needed and went shopping.

Below is a photo of the fabrics before I started cutting.  The red is a pretty corduroy from the clearance table, the large blue is fleece, the small blue is a satin remnant, and the small red fabric is a sparkly red stretch.  The yellow bundle is a fleece remnant.  Note:  Remnant = cheap!


I have measurements for the actor who will portray Farquaad, but a fitting will be needed fairly early in the process.  So, allowing for adjustment, I went ahead and cut and partially sewed as many pieces as I could.


 This weekend, when Paulette has Farquaad's puffy chest ready, I will fit the pieces to the actor and pin everywhere needed to make it fit.  Hopefully, no re-cutting or piecing will be needed!  I will also have to get a tracing of his hand for the gloves.   After that, I should be able to stitch the entire costume together and bling it up with the gold trim I got on sale. The only remaining really tricky part is to design the hat so that it stands up and holds its shape.

The Wedding costume is next.  I will be using the exact same design but with different fabrics - probably white with gold.  If I can keep good notes and patterns for the Ruling costume, the Wedding costume should be a snap.  But, as we know, the unexpected lurks around every corner.  So no relaxing here until it is done!

Friday, March 14, 2014

Channel-back Chair Slipcover

Another day, another project.  At least, that is what my life seems to be lately!    Since I will be offering various sewing and craft services to the public, it seemed like a good idea to share my projects, results, and thoughts with you as I go. 

My current project is slip-covering a chair in my sun room.  This chair was compromised from the beginning when the upholsterer ran my floral fabric sideways!  (Another story for another time…)  For the last couple of years it has been one of the beds of choice for my dogs, who spend the night in that room.  Needless to say, it isn’t people-friendly anymore!   

My plan is to make a slipcover and put it on the chair, then cover it with a vinyl piece that will keep the chair itself clean and dog-smell-free.  After cleaning and deodorizing the chair, I went ahead and did the vinyl cover, cutting to fit and sewing around the front of the arm.  You’ll see the finished vinyl piece later…  


Getting started on the slipcover, the first steps were to prewash the fabric, then iron it.  

By prewashing, I know that I will not have a problem later when I wash the slipcover!  It is worth the extra steps.   When the fabric was ready, I measured all of the cording needed and went ahead and prepared all the cording in the lengths I would need.

The cushion came next.  The picture shows tracing the cushion to get a pattern.  You can see how yucky that cushion is!  I took the old fabric off and threw it away.  Also in the picture is the zipper section that goes in the back of the cushion.  

The next picture shows starting the fitting.  I knew this chair would be a little more difficult because it is a “channel back”, meaning there are deep channels down the inside back.  If you are upholstering, no problem – you cut new pieces from the old and sew them together.   This leads me to mention that upholstery is generally much easier than slipcovering (once the staples and old fabric have been removed) because you can use the old pieces as a pattern.  Plus for the most part in upholstery you attach one piece at a time to the frame, adjusting and finalizing as you go, stapling in place.  With a slipcover, you have to pin or mark pieces, then take the pieces to your sewing machine to sew together, then put them back on and keep going.  (I used pins, said “ouch” a lot.)   And the piece has to be able to be put on, fit tightly, and come back off for washing. 

With this chair, the channels had to be tucked, and left as deep as possible so the tucks could be pushed into the channels in the finished piece.   It was time-consuming, but turned out.

After preparing the inside back, I cut the under-seat-and-front piece to size, then fitted the inside arm from both sides onto it and sewed in together.  (The inside arm goes from the cushion area up and around the arm to the outside of the chair.)   Next was pinning and sewing the outside sides (underneath the arm) to the inside arm.  The front of the arms was the next tedious part!  The pictures show pinning the arm (as the others, with the wrong side of the fabric facing out) and the finished product (right side out).  

Almost done!  Next I attached the inside back (with the channels) to the inside arm and seat.  (Note that you have to leave several inches of extra length in the seams connecting the seat to the inside arms and to the inside back to tuck in.)   Then the back cording and back piece.  The back piece is easy except for the zipper, which isn’t bad, just more work.  Finally, the cording around the bottom.  I went back and forth about whether to have a skirt, but decided against it.  So I attached elastic pieces where the legs were to keep the slipcover from riding up.  

 
I used a zipper in the side of the back (shown above) to close the slipcover. 

I think the slipcover turned out well.   I worked on this over about 3 days, so easier said than done!

The vinyl piece I laid on top of the slipcover for the dogs may or may not stand up.  We have large dogs (standard poodle and  Labradoodle) and their claws and size just may be too much.  But we will see…  


Next  up – possibly Lord Farquaad costumes for the upcoming Shrek The Musical performance.  Should be fun!